Removing the Caulk from Your Shower: The Need-To-Know

You’ve started with the deep house cleaning session, and suddenly you realize the caulk on your shower doesn’t seem quite right. Will good cleaning do the trick, or does it need to be replaced? If it does, do you know how to remove caulk from shower? Worry not. We are here to unwrap all things caulk for you!
We will discuss a common household duty that considerably impacts the durability and cleanliness of your bathroom: removing caulk from shower. This all-inclusive guide will provide all the tips and tricks you need to tackle this task confidently.
What Is Caulk & Why Do You Need to Remove It?
Caulk is a waterproof material used to seal joints and seams in different areas of your house, including your shower. It’s an adaptable substance that serves as a barrier against dust, water, air, and other potential nuisance. In the bathroom areas, caulk is usually applied around the edges of the bathtub or shower, around the sink, and sometimes around the toilet base.
Over time, caulk can develop mildew and mold, degrade, or become discolored. When this happens, you should know how to remove the old caulk from shower and replace it with a new layer to preserve the cleanliness and structure of your bathroom.
Why is Caulk Important
Caulk serves a central role in preserving your bathroom’s good condition. It prevents water from seeping into cracks, defending your bathroom from possible water damage. On top of it, it helps keep your bathroom looking clean and well-maintained by providing a slick, clean line that finishes off your bathroom fixtures.
Caulk is more than a mere sealant. It’s a vital part of maintaining the overall good condition of your house. Apart from preventing water from seeping into areas where it can cause damage, it also helps to keep out pests and drafts, making your home more pleasant and energy-efficient.
Types of Caulk
Several caulk types are available on the market. Each has its own set of characteristics that make it fit for multiple applications. Silicone is one of the most popular types of caulk used in bathrooms because of its superior water resistance and long lifespan. But be aware that it’s more challenging to apply and smooth than other types of caulk.
How to Remove Caulk from Shower: Ultimate Guide
As time passes, caulk can become discolored, moldy, or start peeling away. This not only draws away from the visual appearance of your bathroom but also endangers the effectiveness of the caulk. When this occurs, it’s a sign to remove the old caulk and replace it with a fresh layer.
We know that removing caulk from shower might sound dreadful to you, but with the right technique and tools at your disposal, it can be really straightforward. Follow our user-friendly step-by-step guide on how to remove caulk from shower.
Step 1: Soften the Caulk
You want to start removing old caulk from shower by softening it first. This can be achieved by applying caulk remover products that break down the caulk. Once dissolved, it’s much easier to remove the caulk.
Apply the remover as instructed on the packaging, normally by administering a generous amount on the caulk and allowing it to sit for several hours. For best results it’s good to leave it overnight. The more time the remover sits, the easier you can remove the caulk.
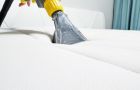
Step 2: Strip the Caulk
Once the caulk is softened, it’s time to start removing it. Use a caulk remover tool to loosen it for easier removal. These tools are specially designed to remove caulk without damaging the surrounding surfaces.
As you pull the caulk, be careful not to scratch your shower’s surface. When doing it right, most of it will come off in long strips, but there is a chance you might need to get some needle-nose pliers or tweezers to finish off the job.
Step 3: Clean the Surface
After removing caulk from shower, it’s essential to clean the area completely in order to ensure no residue is left over. A toothbrush or a small butter knife can be the perfect tool for this. Once the surface is clean, wipe it down with alcohol. This will help remove any old caulk residue and ensure the new caulk will adhere properly.
Step 4: Kill Any Mold or Mildew
If there is any sign of mildew or mold present, you can get rid of them effectively by mixing one-third of a cup of bleach with one gallon of water. This will kill the mold and mildew, preventing them from spreading under the new caulk. Let the surface air dry thoroughly before applying the new caulk.
What to Do After You Remove Caulk from Shower?
After you successfully remove the old caulk, clean the area, and kill any mold or mildew that might have appeared, it is time to apply a fresh layer of caulk. This will ensure your shower is well-sealed and safe from any possible water damage.
Applying caulk is a relatively straightforward procedure, but it does require high-level precision to have a neat, professional finish.
Start the process by making a 45-degree angle incision to the tip of the caulk tube. This will allow you to administer the caulk in a smooth, even line. Apply the caulk to the seam or joint, then use your finger or a caulk tool to smooth it out. This will result in a tight seal and clean finish. Let the caulk fully dry for a day before using the shower.
If you feel uncomfortable doing this alone, a professional caulker is a great option for avoiding caulking mess and headaches.
Preventing Caulk Issues in the Future
While learning how to remove caulk from shower is fundamental, understanding how to prevent caulk problems in the future is equally important. You can extend the longevity of your caulk and preserve the cleanliness and integrity of your bathroom by taking some preventive measures.
Choose the Right Caulk
As mentioned earlier, not all caulk is the same. It’s best to use a caulk explicitly designed for high-humidity environments in our bathroom. The most popular choice award due to its endurance and water resistance goes to the silicone caulk. Keep in mind that beginners prefer to work with high-quality latex caulk since it’s easier to maneuver.
Apply Caulk Properly
Correct application is key to avoiding caulk troubles. Before you apply the new caulk, be sure the area is completely dry and clean. Apply it in a smooth, even line to ensure a clean finish and tight seal.
Latex caulk, otherwise known as acrylic caulk, is more beginner-friendly since it is easier to apply. But, it’s not as water resistant and durable as silicone, so it probably won’t be the best choice for high-moisture areas like showers.
Regular Maintenance
Routine maintenance is of great use in preventing caulk problems. This includes cleaning the caulked areas frequently to avoid the buildup of mildew and soap scum, which can lead to the deterioration of the caulk faster.
If you notice any signs of damage and wear, it’s best to address the problem immediately before it takes a turn for the worse.
Proper Ventilation
Proper ventilation in your bathroom goes a long way in preventing mold and mildew growth on your caulk. Consider opening a window during and after showers or installing a bathroom fan to decrease humidity levels. Follow these preventive tips and tricks, and you can keep your caulk looking fresh and effective for years to come.
When to Call a Professional
While removing and replacing caulk is a task that plenty of homeowners can do themselves, there are times when the best way to remove caulk from shower is to call in a professional. Hiring a professional is best when:
- The caulk is in a hard-reach area
- There is a large amount of mildew or mold present
- You are wondering how to remove silicon caulk from shower
- You are simply not comfortable doing the work yourself
Removing Caulk from Shower: Concluding Remarks
Removing caulk from shower is a vital task that will play a big part in maintaining the sanitation and longevity of your bathroom. Armed with knowledge about the techniques and the right tools, you will have no problem with the thought of how to remove caulking from shower and replace it with a brand new layer.
Remember, if you need any assistance or guidance on how to remove caulk from shower, as well as proper clean-up after your project, Certified Clean Care is just a call away.
FAQ
How do you fix a bad caulking job?
If you’ve made a mistake while caulking, worry not! You can easily remove the fresh caulk using a caulk remover tool and start over.
What dissolves dried silicone?
Dried silicone caulk can be dissolved using a silicone caulk remover, which can be found at most home improvement stores. If you are unsure how to remove silicone caulk from shower, call a professional.
What happens if you don’t remove old caulk?
If you don’t remove the old caulk, it can result in mildew and mold growth due to trapped moisture. It can also weaken the seal, leading to possible damage.
What happens if you shower with wet caulk?
Showering with wet caulk can lead to the caulk washing away or not adhering properly. We advise you to be patient until the caulk is dry before using the shower.
Recent Posts


Categories